Category: Camping & Road Trips

  • Subaru Roof Tent Setup

    Disclosure: This article contains affiliate links. I may earn a commission at no extra cost to you.

    Our Roof Tent vs Ground Tent guide covers whether a roof tent is the right choice. This one assumes you’ve already decided and covers what actually happens next — mounting it correctly, using it for the first time, and keeping it in good shape.
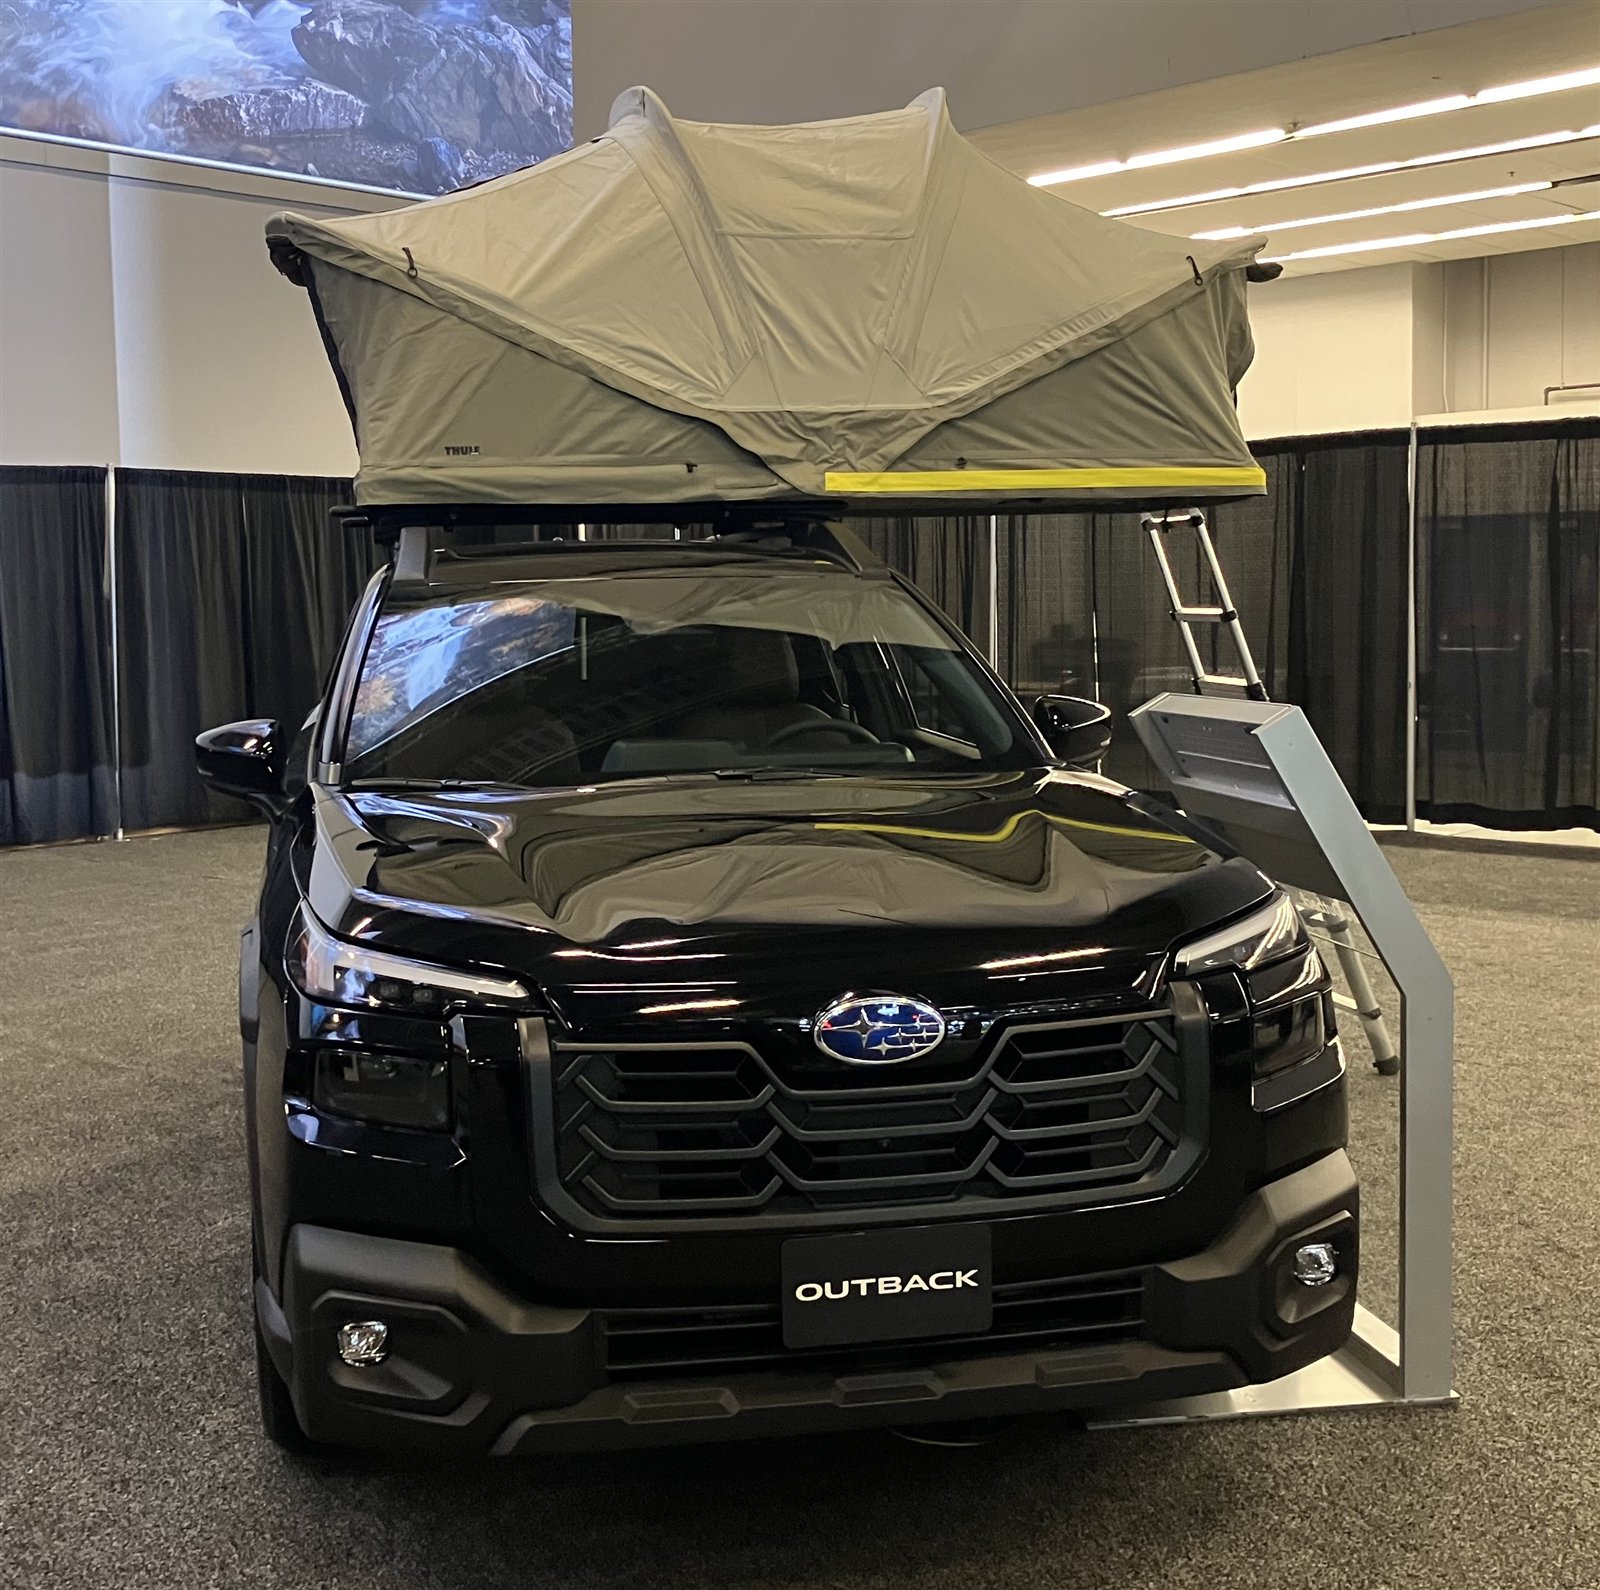
    Black Subaru Outback with a Thule roof tent fully deployed, ladder extended
    Photo: Bull-Doser, public domain, via Wikimedia Commons

    Confirm Your Crossbars Can Actually Support It

    This is the step that gets skipped and shouldn’t be — a roof tent is one of the heaviest common crossbar accessories, and mounting one on crossbars rated below its weight is a real safety issue, not a minor technicality. Check both the tent’s weight and your crossbar’s dynamic (driving) rating before ordering anything. See our How Much Weight Can Subaru Crossbars Hold? guide.

    Positioning on the Crossbars

    Center the tent’s weight between the crossbars rather than favoring one end — most tents ship with a mounting template or clear guidance for this. Getting the position right the first time matters more for a roof tent than almost any other crossbar accessory, since it’s not something you’ll want to readjust often once it’s loaded and in regular use.

    Practice Setup and Breakdown at Home First

    The first time deploying and folding a roof tent should not be at a campsite in the dark or in bad weather. Practice the full cycle — open, ladder out, mattress unrolled, then fully broken back down — at home first, ideally more than once, so it’s familiar before it actually matters.

    What Changes About Daily Driving

    Once mounted, expect a real fuel economy hit, more wind noise, and a permanently increased vehicle height — worth remembering at parking garages, drive-thrus, and your own garage door. Most roof tents aren’t practical to remove and reinstall for every trip, so plan for these tradeoffs as ongoing, not occasional.

    Basic Maintenance

    Check mounting hardware periodically for looseness, especially after the first few hundred miles of driving with it installed — vibration can work fasteners loose faster than a static accessory would. Let the tent fully dry before folding it down after a wet trip to avoid mildew building up in storage between uses.

    Common Mistakes

    • Skipping the crossbar rating check. The single most important step, and the easiest one to skip.
    • Learning the setup process for the first time at a campsite. Practice at home so it’s second nature before it matters.
    • Packing it away wet. Leads to mildew and odor that’s genuinely hard to fully remove once it sets in.

    FAQs

    How long does it take to set up a roof tent?
    Most fold out in under a minute once you’re familiar with it — longer the first few times before the process is second nature.

    Do I need to check anything before driving with it installed?
    Yes — check mounting hardware periodically, especially after the first few hundred miles, since vibration can loosen fasteners faster than expected.

    Can I remove it between trips?
    Technically, but most roof tents are heavy and awkward enough that frequent removal and reinstallation isn’t realistic for most owners — plan for it to stay mounted.

    Final Thoughts

    A roof tent is a genuinely good setup once it’s properly mounted and you’re comfortable with the routine — the real work is upfront: confirming crossbar capacity, positioning it correctly, and practicing setup before the first real trip.

    Related Guides

  • Subaru Adventure Setup: What Actually Works

    Disclosure: This article contains affiliate links. I may earn a commission at no extra cost to you.

    This site covers a lot of ground — road trips, camping, dogs, family setups, storage, roof accessories. This one doesn’t re-explain any of it. It’s a single starting point that connects the pieces, so you can find the specific guide for whatever kind of adventure you’re actually planning instead of piecing it together from scratch.

    Start With What Kind of Trip This Actually Is

    A weekend trip, a family road trip, and a camping trip all call for genuinely different setups — see our Best Weekend Trip Setup, Subaru Family Road Trip Setup, or Subaru Family Camping Setup guides depending on which one matches. Over-preparing for a short trip or under-preparing for a longer one is the most common planning mistake on this whole site.

    Sleeping: Inside the Vehicle or a Tent

    For solo or couple trips, sleeping inside the vehicle is genuinely comfortable with the right setup — see the model-specific sleeping guides. For families or anyone who wants more space, a tent (roof or ground) is the better call — see our Roof Tent vs Ground Tent comparison.

    Cargo: What Fits and What Needs to Go on the Roof

    Know your actual interior capacity first — see the What Fits guides for your model — before deciding whether roof storage is genuinely necessary. Most people don’t need it as early as they expect.

    Organization: Match the System to How Often You’ll Use It

    Free DIY fixes solve most occasional needs — see Interior Storage Ideas. Real upgrades (organizers, drawer systems) are worth it once you know the need is frequent and genuine — see Storage Upgrades That Actually Help.

    If Dogs or Kids Are Coming Along

    Both change the setup meaningfully — see Most Useful Accessories for Dog Owners or Most Useful Accessories for Families depending on who’s along for the trip.

    Common Mistakes

    • Planning gear before planning the trip type. A weekend trip, a family road trip, and a camping trip need genuinely different setups.
    • Buying roof storage before checking actual interior capacity. Most people have more room than they think.
    • Over-organizing for a trip you’ll take once. Match the system’s cost and permanence to how often you’ll actually use it.

    FAQs

    Where should I start planning an adventure setup?
    With the trip type — a weekend trip, family road trip, and camping trip all need different gear and organization.

    Do I need roof storage for most trips?
    Usually not — check your actual interior capacity first using the model-specific “What Fits” guides before assuming you need it.

    Final Thoughts

    There’s no single “adventure setup” that fits every trip — the right gear depends on trip type, group, and how often you’ll actually use each piece. Start with the trip type, then work through sleeping, cargo, and organization from there.

    Related Guides

  • Most Useful Subaru Accessories for Camping

    Disclosure: This article contains affiliate links. I may earn a commission at no extra cost to you.

    Between the sleeping guides, the tent comparison, and the storage articles already on this site, there’s a lot of camping-specific content to sort through. This pulls the essentials into one starting point for camping specifically.

    Somewhere to Sleep

    Whether that’s inside the vehicle or a separate tent depends on group size and how often you camp — see our Roof Tent vs Ground Tent guide if you’re leaning toward a tent, or the model-specific sleeping guides if you’re planning to sleep inside the vehicle itself.

    Shade and Shelter at the Site

    A roof-mounted awning turns the area next to the vehicle into usable, covered space in a few minutes — see our Best Awning for Subaru guide for specific picks.

    A Cooler That Keeps Food Separate

    An RTIC cooler keeps food contained and separate from sleep and cook gear, which matters more on a multi-day trip than it does for a quick outing.

    Organized Gear Storage

    Collapsible bins organized by category (see our Subaru Camping Storage Ideas guide) cover most people’s needs; a drawer system is worth it only for frequent, gear-heavy campers — see our Drawer System vs Storage Bins comparison to decide.

    Common Mistakes

    • Buying gear before deciding on a sleeping setup. The tent-vs-vehicle decision affects almost everything else you’ll pack.
    • Skipping an awning and regretting it the first rainy trip. Cheap relative to how often it actually gets used once owned.
    • Over-investing in storage before a few real trips. Bins solve most people’s needs — see what you actually use before upgrading to a drawer system.

    FAQs

    What’s the first camping accessory to buy?
    Whatever solves your sleeping setup first — everything else (storage, shade, cooking) organizes around that decision.

    Do I need a drawer system for camping?
    Only if you camp frequently enough that the organization time savings outweigh the cost — most occasional campers do fine with bins.

    Final Thoughts

    Start with the sleeping decision, add an awning and a cooler, and organize the rest with bins until you know whether you camp often enough to justify more. That covers most people’s real camping needs without overbuying up front.

    Related Guides

  • Subaru Overlanding Setup for Beginners

    Disclosure: This article contains affiliate links. I may earn a commission at no extra cost to you.

    Worth being upfront about this one: this site is built around practical everyday use, road trips, and camping — not overlanding as a focus. A stock or lightly-equipped Outback, Forester, or Crosstrek also isn’t a purpose-built overlanding rig the way a lifted 4Runner or Jeep with real ground clearance is. That said, plenty of Subaru owners get curious about it, and a modest version is genuinely achievable without turning your daily driver into a full build. This is the beginner-friendly version, not a deep technical guide.

    What “Overlanding” Actually Means Here

    At its simplest, overlanding is self-sufficient, vehicle-based travel — camping and exploring further from pavement than a typical car-camping trip, without needing a full support infrastructure. It doesn’t require a heavily modified vehicle to start; it requires being self-sufficient for a few days, which a well-organized Subaru can genuinely do for mild trails and dispersed camping.

    What a Stock Subaru Can Realistically Do

    Symmetrical AWD and decent ground clearance (especially on Wilderness trims) handle maintained dirt and gravel roads, mild forest service roads, and dispersed campsites without much trouble. What it can’t do is technical rock crawling, deep mud, or serious water crossings — the kind of terrain that actually needs a lifted, heavily modified vehicle. Knowing that line before a trip matters more than any piece of gear on this list.

    A Realistic Starting Setup

    Most of what a beginner setup needs is already covered elsewhere on this site: a roof or ground tent for sleeping, an awning for shelter at camp, and a drawer system or storage bins for organized gear. The overlanding-specific additions worth considering are a basic recovery kit (traction boards, a tow strap) and a way to check tire pressure and air back up if you air down for softer terrain — neither is expensive, and neither commits you to a bigger build.

    Common Mistakes

    • Attempting terrain beyond what a stock Subaru can handle. Ground clearance and lack of low-range gearing are real limits, not suggestions.
    • Buying a full modification package before one real trip. Start with what you already have plus a modest addition or two, then decide what’s actually missing.
    • Skipping a basic recovery plan. Even mild terrain occasionally goes wrong — a simple kit and a plan cost little and matter a lot when needed.

    FAQs

    Can a stock Subaru go overlanding?
    For mild dirt roads and dispersed camping, yes. For technical terrain, no — that needs more ground clearance and capability than a stock Subaru offers.

    Do I need a lift kit to start?
    Not for a beginner setup on mild terrain. A lift becomes relevant once you’re consistently pushing into rougher trails than a stock ride height comfortably handles.

    Is this site focused on overlanding?
    No — this is a general practical-use and camping site. This article is a beginner-friendly starting point, not deep technical overlanding coverage.

    Final Thoughts

    A modest overlanding-style setup is realistic on a Subaru for mild terrain and self-sufficient camping — it doesn’t require a full build to get started. Know the vehicle’s real limits, start with gear you’d likely want for camping anyway, and add the overlanding-specific pieces only once you know you’ll actually use them.

    Related Guides

  • Subaru Camping Storage Ideas

    Disclosure: This article contains affiliate links. I may earn a commission at no extra cost to you.

    Our Interior Storage Ideas for Subaru guide covers everyday storage. Camping storage is a different problem — it’s not about daily clutter, it’s about organizing enough gear for a multi-day trip so you’re not digging through everything every time you need one item.

    Quick Picks

    • Best for category separation: Collapsible storage bins — one per gear category, flattens down for the drive home.
    • Best for fragile or heavy gear: Hard storage bins — worth the extra space for cookware and anything that needs real protection.
    • Best cooler: RTIC cooler — keeps food separate from everything else, which matters more on a multi-day trip than it does for daily use.

    Separate by Category, Not by Person

    Organizing camping gear by category — cook gear, sleep gear, clothes, safety and first aid — works better than organizing it by person, because most tasks at a campsite involve one category at a time. Making dinner means you need the cook bin, not everyone’s individual bags. This is the single biggest organizational shift from everyday storage, where “whose bag is this” actually matters.

    Keep Wet and Dirty Gear Away From Everything Else

    Muddy boots, a wet tent, or used cookware shouldn’t share space with clean clothes or dry sleeping gear — a dedicated bin or bag for anything wet or dirty, packed separately from day one, saves a genuinely unpleasant cleanup later. This matters more on the way home than on the way out, since gear picks up moisture and dirt over the course of a trip.

    Pack for Setup Speed, Not Just Capacity

    What you need first at a campsite (tent, cook gear) should be the easiest to reach, not buried under what you need last (sleeping bags, pajamas). Packing in reverse-use order — last-needed items in first, first-needed items in last, closest to the hatch — cuts real time off setup at the site.

    What Goes Where for a Quick Morning Departure

    Whatever gets used last before leaving a site — the tent, sleeping bags, cook gear from breakfast — inevitably gets packed last and ends up on top. Planning for that instead of fighting it (leaving room near the hatch specifically for these last-packed items) makes breaking camp faster than trying to force everything back into its “ideal” original spot.

    Common Mistakes

    • Organizing by person instead of by category. Most campsite tasks need one gear category, not one person’s full bag.
    • Packing wet or dirty gear next to clean gear. Separate them from the start rather than sorting it out later.
    • Ignoring use-order when packing. What you need first at the site should be easiest to reach, not buried under everything else.

    FAQs

    What’s the best way to organize gear for a camping trip?
    By category (cook, sleep, clothes, safety) rather than by person — it matches how gear actually gets used at a campsite.

    Should wet gear go in the same bin as everything else?
    No — keep it separate from day one to avoid a bigger cleanup problem by the end of the trip.

    How is camping storage different from everyday storage?
    Camping storage is about categories and use-order for a multi-day trip; everyday storage is about quick access to a handful of small daily items. See our Interior Storage Ideas for Subaru guide for the everyday version.

    Final Thoughts

    Camping storage works best organized by category and packed in reverse-use order — not by trying to fit everything as tightly as possible. A little planning before the trip saves real time at the campsite, both setting up and breaking camp.

    Related Guides

  • Sleeping in a Subaru Crosstrek

    Disclosure: This article contains affiliate links. I may earn a commission at no extra cost to you.

    The Crosstrek has the shortest cargo floor of the three Subaru models, and sleeping in it works best when that’s treated as a given rather than something to work around. For a solo trip with minimal gear, it’s genuinely fine. As a two-person setup, it’s more of a stretch than a tight fit — worth knowing before you’re at a campsite finding out the hard way.

    Sleeping space in a Subaru Crosstrek, top-down viewTop-down floor plan of an SUV showing a sleeping pad placed at a steep diagonal angle to fit within the folded rear seat and full trunk area, indicating a tight, solo-recommended fit.Seats FoldedSleeping PadPillowRear Seat (folded)TrunkTight Fit — Solo Recommended

    How Much Room You Actually Have

    With the rear seats folded, most adults fit solo, though sleeping fully flat and stretched out is less reliable here than in either the Outback or Forester — a bent-knee position or slight diagonal is common rather than an exception. The narrower wheel wells also mean gear placed alongside a sleeping pad has less give than it would in the other two models.

    Why Two People Is a Stretch, Not Just a Tight Fit

    Being direct about this rather than glossing over it: two adults sleeping in a Crosstrek works, but it requires minimal gear, a genuinely flat pad, and realistic expectations about comfort. It’s not the setup to plan a multi-night trip around. For regular two-person camping, the Outback or Forester will save real frustration.

    Mattress and Pad Options

    A low-profile foam pad like the HEST Foamy is the clear choice here over an air mattress — the Crosstrek’s tighter, more irregular floor space doesn’t suit a mattress that wants a large flat area to inflate properly. Foam fillers for the seat-fold gap matter more here than in either other model, since there’s less total length to make up for wasted space.

    Staying Warm (Or Cool) Overnight

    The floor-insulation issue is the same across all three models — a wool blanket underneath a sleeping bag helps regardless of which one you’re in. The Crosstrek’s smaller cabin volume means condensation builds a bit faster than in the Forester or Outback, so cracked windows with a bug screen are worth setting up every time, not just on humid nights.

    If You’re Taller Than Average

    The Crosstrek’s floor length makes this the most relevant of the three models — most sleepers over about 5’8″ will need to sleep at an angle or with bent knees. That’s a normal, expected adjustment here, not a sign the setup is wrong. If sleeping fully flat matters to you, test it at home first, or consider the Outback for regular use.

    Common Mistakes

    • Planning a two-person trip without testing it first. Works, but the margin for comfort is thin — a trial run at home avoids a bad surprise at a campsite.
    • Bringing an air mattress instead of a foam pad. The Crosstrek’s tighter, less regular floor space suits a low-profile foam pad better.
    • Overpacking gear alongside the sleeping area. There’s less margin here than in the Outback or Forester — pack lighter than you think you need to.

    FAQs

    Can you sleep comfortably in a Crosstrek?
    Yes, solo, with a simple setup. Two people works but requires more compromise than in an Outback or Forester.

    Is the Crosstrek a good choice for regular car camping?
    For solo trips, yes. For regular two-person or family camping, the Outback or Forester will be noticeably more comfortable.

    What’s the best mattress for a Crosstrek?
    A low-profile foam pad — it handles the tighter, less regular floor space better than an air mattress does.

    Final Thoughts

    The Crosstrek is a genuinely good solo car-camping vehicle and an honest stretch as a two-person one. Match your expectations to which of those two trips you’re actually planning, and it works well either way.

    Related Guides